We love turning fresh vegetables from the garden or farmers market into a homemade giardiniera dish, a wonderful Italian condiment or side dish that is very versatile because you can use virtually any veggie you love. It makes the perfect addition to a quick and easy lunch of sliced cured meats and cheeses with some crusty bread and a side of delicious homemade giardiniera pickled vegetables.
What is giardiniera?
The root of the Italian word giardiniera is “giardino,” or garden in English. In fact, this delicacy was created as a way to preserve extra vegetables from the garden through the winter months without refrigeration. When the garden was truly bountiful, a vinegar solution was made and the veggies were blanched and then canned to last for months. The delicious giardiniera was then brought out later to brighten the table with its rich array of colors and as a side dish served alongside Italian beef cooked various ways, cold cuts and cheeses and much more.
What equipment do you need to make this recipe?
Here is the kitchen equipment you will need in order to make a delicious batch of homemade giardiniera recipe to enjoy for months afterwards.
a large pot for boiling the liquid
a very large pot for sterilizing jars and doing the hot water bath
a hand strainer
a large bowl
several canning jars with new lids
plastic discs for canning
a knife
a cutting board
Making this Italian giardiniera recipe will take you about 2.5 hours. The recipe is easy to follow, but there are several steps you will need to follow exactly so that the homemade giardiniera is safe to store over a long period of time.
Ingredients for making giardiniera
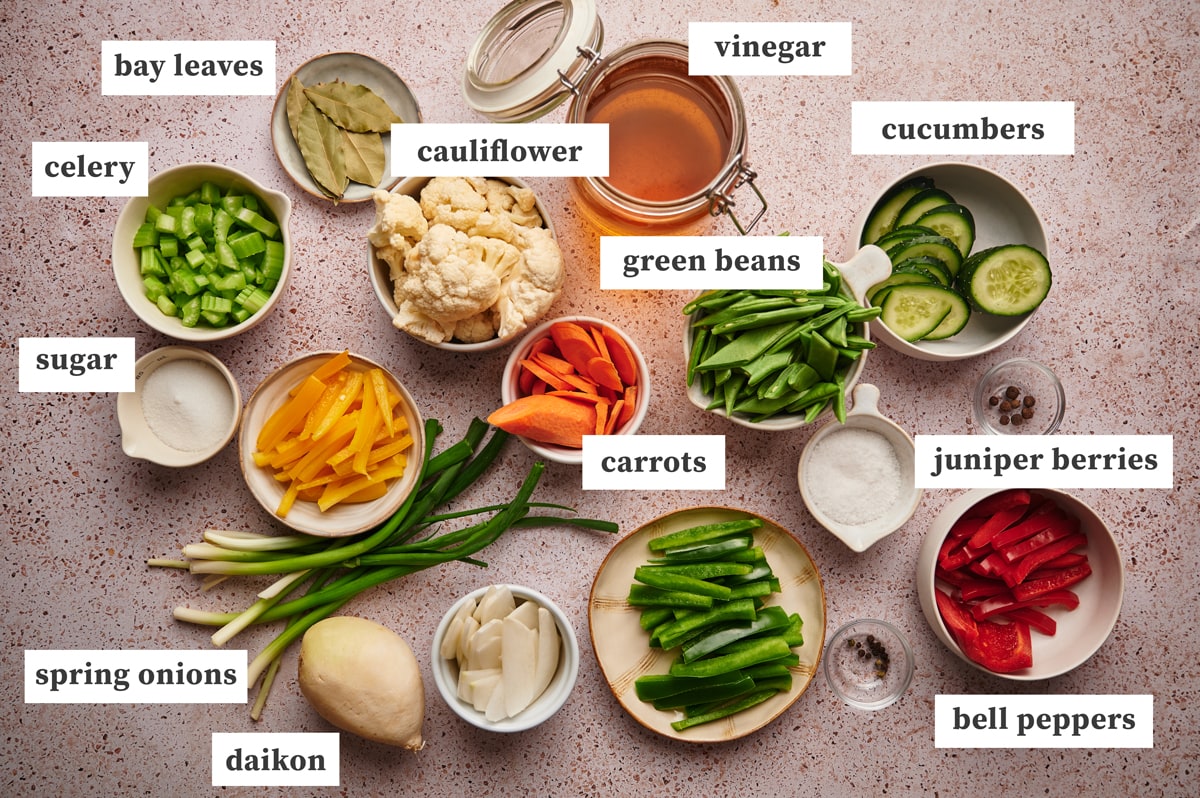
You will need a lot of ingredients, including all the vegetables, to make this homemade giardiniera recipe, but it is worth it as you will get several jars that you can store and use over many months.
Water (2 liters) – regular tap water or drinking water is fine.
White wine vinegar (2 liters) – we recommend getting a good quality white wine vinegar as the taste will really matter in this recipe.
Kosher salt (50 grams) – we prefer a good quality kosher salt to make this homemade giardiniera recipe.
Sugar (50 grams) – granulated or white sugar is what you should use.
Bay leaves (5) – using dried or fresh bay leaf, also called laurel leaf, is a way to give a distinct flavor to your giardiniera recipe.
Juniper berries (7) – do not add too many of the juniper berries as they have a very strong flavor and are best used sparingly.
Black peppercorns (10) – You should use whole black peppercorns instead of freshly ground black pepper for this recipe so you get the taste but the liquid stays “clear.”
Cauliflower (600 grams) – you can use any color of cauliflower because the more colors the better for this beautiful homemade giardiniera recipe. Be sure to cut them up into bite sized florets.
Spring onions (300 grams) – leave the onions whole and intact, choose the smallest you can find so that they are bite sized.
Cucumbers (400 grams) – you will want to choose the smallest cucumbers so that they have the least amount of seeds in them.
Green beans (300 grams) – we recommend only using fresh green beans and never frozen as they get too mushy when cooking and can fall apart. Also, be sure to cook only the suggested length of time and never more.
Bell peppers (300 grams) – for the most beautiful outcome, we recommend a mix of different colored bell peppers such as yellow, orange and red bell pepper.
Daikon (300 grams) – be sure to clean the daikon properly and cut into bite sized (or smaller) pieces.
Carrots (300 grams) – bright orange carrots are one of the best things about this dish. Be sure to use freshly harvested carrots that are still crunchy.
Celery (300 grams) – clean the celery very well and chop into a little longer than bite sized pieces. You can also add celery seeds to your giardiniera if you like the flavor, we recommend no more than a pinch.
How to make giardiniera step by step
This step-by-step guide to making homemade giardiniera is easy to follow and the finished product is tasty pickled vegetables you are sure to love! What a great recipe!
In a large pot, add the white vinegar, water, salt and sugar and stir to dissolve. Bring the liquid to a boil and add the bay leaves, juniper berries and peppercorns as well. photo 1
Clean the cauliflower and cut it into florets, then put it into the boiling liquid and let it blanch for about 4 minutes. Remove with a hand strainer (leaving the liquid in the pot) and set aside in a large bowl. photo 2
Peel the carrots, cut them into thinly sliced sticks and blanch them for 4-5 minutes in the pot and then remove with a hand strainer and set aside in the same large bowl with the cauliflower. photo 2
Clean the spring onions and celery and then chop the celery into smaller bite size pieces, blanch these vegetables as well for 4-5 minutes, remove with a hand strainer and set aside.
Now clean and cut the bell peppers into short strips and clean the green beans and cut them in half. Blanch both for 3-4 minutes, remove with a strainer and add to the bowl. photo 4
Clean and chop the daikon and clean and slice the cucumbers, blanch them together for 3 minutes, remove with a hand strainer and set aside.
Mix all the cooked vegetables together. photo 5
Take a sterilized jar, place the cooked, chopped vegetables inside and press them down to fit as many veggies as possible inside. photo 6 Place the plastic disks for home canning on top, which will be used to keep the vegetables below the liquid level, and then pour in the cooking liquid until it is 1 cm from the rim and fully covers all veggies. Photo 7 and 8
Screw the lid on each jar as you finish it.
Once you have completed all the jars, place them in the bottom of a very large pot, and wrap a clean tea towel around the jars so they do not bump into each other while in the boiling water. Fill the pot with water so that all the jars are completely submerged and bring to a boil.
Boil for 30 minutes, which should be enough time for a vacuum to form. If it has not, keep boiling until it does. Turn off the heat, carefully remove the jars and turn them upside down to cool.
For the best flavor, store your jars in a dark, cool location and wait about 1 month before you consume your first jar of giardiniera so the flavors have time to meld together.
Expert tips for making Giardiniera
Don’t overcook the veggies. Remember that all vegetables, at the end of their respective cooking times, should remain crisp and fresh looking. You don’t want to overcook them as they will lose their color and crunchy texture.
Check the vacuum seal. To check that the vacuum seal has worked correctly, you should check each jar lid by pushing on the center. If the lid stays in the lower position and doesn’t make any noise, it has sealed correctly. If instead you can push it down and it comes back up and makes a popping noise, it has not sealed correctly and should kept in the fridge and consume it within a few days. Do not store a jar that has not properly sealed at room temperature for any length of time.
Chicago style giardiniera vs traditional Italian giardiniera
The Italian version of this recipe is different from the Chicago style giardiniera that is more commonly found in the United States. The main difference is the size of the vegetables, with the Chicago style giardiniera having smaller pieces and being used more as a relish or condiment. A second big difference is that the Chicago style giardiniera is first made with vinegar and then the vegetables are drained and preserved in olive oil or another type of oil. One last difference is that Chicago style giardiniera has a “hot mix” version with red pepper flakes or even hot peppers such as jalapeno or serrano peppers added to it that will really wake up your taste buds.
As we mentioned, unlike the Italian style giardiniera which is used more like a side dish to a main course, the Chicago style giardiniera is used more like a condiment and commonly put on things like sausage sandwiches, hot dogs, Italian subs, scrambled eggs, pasta or even pizza.
Giardiniera Recipe: Variations
Get creative with the veggies. There is no reason you have to stick with exactly this recipe, you can create your own vegetable mixture. Get creative and add other flavoring or personalize your giardiniera with vegetables such as asparagus, turnips or radishes. Be sure to use the proper amount of white vinegar solution so that it can be stored safely.
Add olives. We love the addition of green pitted olives to our homemade giardiniera recipe.
Spice it up. If you love spicy foods, don’t be afraid to add pepper flakes or even jalapeno or serrano peppers, for some people the hotter the better!
How to sterilized jars for giardiniera
When making this homemade giardiniera recipe, you will need to sterilize the jars before using them to store the pickled vegetables. Because the recipe calls for vinegar, it is one of the safest types of foods to can, but you still need to take a few precautions for food safety like proper sterilization.
Use medium-sized glass jars with new lids that fit correctly.
Put the empty jars and lids in a very large pot and cover completely with a hot water bath and bring to a boil. Boil for several minutes.
Remove the jars carefully with clean tongs and place on a clean towel to air dry for a few minutes and then use immediately to fill with your giardiniera pickled vegetables and vinegar solution.
Be sure to follow the instructions in the recipe to boil the filled jars to create a vacuum seal.
How do I store giardiniera?
If they have been properly treated to create a vacuum seal and the jars are stored in a cool, dry place away from light and heat sources, your giardiniera will keep for 3 months. Once a jar has been opened, it should be kept in the fridge and eaten within 3-4 days.
How should I serve giardiniera?
Giardiniera pickled vegetables have a very strong flavor, so it is a good idea to serve them along with other dishes and not all alone. We love them as a condiment at room temp on sandwiches, as a side to an Italian beef main course, stirred into cooked pasta or rice with some extra virgin olive oil, or as an appetizer served with cheeses, salt cured meats and crusty bread.
If you want a less-intense flavor, you can rinse the vegetables with cold water to remove the excess vinegar before using them in other recipes.
Why is giardiniera a Chicago thing?
Giardiniera came to Chicago in the 19th century with the wave of Italian immigrants who settled there. These pickled vegetables, often the hot giardiniera version, became part of the city’s cuisine and have been used as relish on all sorts of sandwiches and dishes ever since, especially with street food on top of a hot dog or Italian sub.
Why is giardiniera so spicy?
Giardiniera does not have to be spicy at all. Italian giardiniera usually has mild bell peppers and not hot peppers like the Chicago style giardiniera often has. You can choose to make your homemade giardiniera either mild or spicy, depending on your individual tastes.
How do you pronounce giardiniera?
Giardiniera is an Italian word that is pronounced “jar din air ah.” But don’t worry, even if you make it you won’t need to spell it or say it out loud, you can simply call it Italian pickled vegetables.
What is blanching?
Blanching is simply putting vegetables in boiling water for a short amount of time to briefly cook them without allowing them to overcook and lose their flavor, color or texture. With the perfect length of blanching, your giardiniera vegetables will be beautiful and maintain a nice crunch and firmness.